I never expected to see a reference to a Linux-based operating system in USA Today. But there it was, in the middle of an article about uses for old flash drives. The author called Tails one way “to protect your privacy when using public computers or a computer you don’t trust.”
In my last post, I
introduced you to Tor. Now I am going to demonstrate Tails, an operating system that routes almost everything through Tor. This is a chronicle of my week with Tails.
Here’s what you’ll need to try Tails for yourself:
- Two flash drives (at least 8GB each, preferably much more)
- Your computer’s manual
- The Tails installation instructions, either printed out or displayed on a smartphone, tablet, or other computer
Before you buy anything new, know that some USB drives won’t work with Tails.
Here’s a list for further reference.
Day 1: Installing Tails
Before you start installation, you’re going to need a computer manufactured no earlier than 2006. Your computer will need to have either a DVD-ROM drive or the ability to boot from a USB flash drive. You’ll also need to have a 64-bit compatible processor, something that is IBM PC compatible. And it will need to be a desktop or laptop; Tails won’t work on a smartphone or tablet. Also, your computer will need at least 2 GB of RAM; the more, the better.
The exact installation procedures vary depending on your computer’s operating system and manufacturer. For this post, I used an Acer Aspire E 15 that came with Windows 10 preinstalled.
Don’t mess up like I did and think you can get away with just copying Tails onto the flash drive and sticking it into a USB port. There is a proper procedure to follow, otherwise your computer will not be able to find Tails. It will ignore the flash drive and load Windows like it normally does.
To install Tails, I had to edit the BIOS of my computer. BIOS (Basic Input/Output System) is a program stored on a chip on your motherboard. This is the program that helps your computer boot up; that is, turn on and load the operating system. I had to change the boot order, the list of places BIOS looks for an operating system. Normally, the list begins with your hard drive. The rest of the list traditionally included a floppy drive, but these days it includes a CD/DVD-ROM drive and USB drives. In my case, I had to change the boot order to make the USB drive the first entry on the list. The method for accessing your BIOS depends on what brand and model of computer you have. This is where your computer’s manual comes in handy.
Keep in mind that during the installation, your flash drives will be reformatted and everything on them will be erased. Windows and Linux use different types of file systems. Once you put Tails on your flash drives, Windows won’t be able to read them.
After you’ve finished installation, hold onto that first flash drive. You can use it to install Tails on other Windows computers; but you’ll still need another flash drive for a new installation.
Day 2: The Tails Desktop
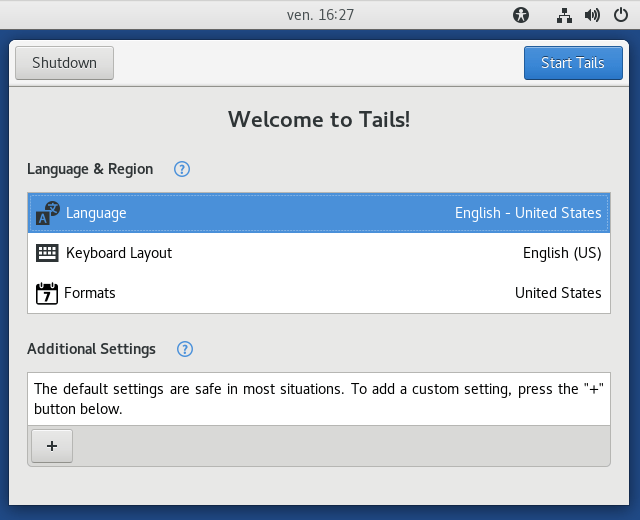
After I got past the title screen, I saw a screen called the Tails Greeter. This is where you can select your language, your keyboard layout, and lock and unlock your persistent storage (more on that later). After you’ve picked your options, click the button that says Start Tails.
When I first got to the desktop, it was different than the computers I was used to. But the layout will be somewhat familiar to those of you who are Mac users.

The Tails desktop; note the upper right hand corner. See how there’s no Wi-Fi symbol?

After Wi-Fi has been enabled and the computer is connected to Tor.
Tails won’t use a computer’s hard drives, but it will use every other piece of hardware – the keyboard, DVD-ROM drive, mouse, etc. There is one exception – your webcam. There was a proposal to introduce a webcam option in 2015,
but it was rejected due to security concerns.My system time was set to Greenwich Mean Time, the time zone for London. I found out that this is a default setting to protect users. Did you know your system’s time zone setting can be a giveaway for your location?
Day 3: Applications
On the third day, I explored all the software. I was surprised at the amount and variety I found. There is far too many to list here, so I’ll give you some highlights.

- NoScript – If you’ve used the Firefox browser, you may be familiar with the extension NoScript. This extension can block any script running on a webpage. There are good reasons for doing this. It’s good way to avoid malicious scripts that are intent on taking over your computer or secretly sending your information to someone without your permission. The recommended setting is to disable scripts globally. The downside is that some websites may not work. But you can select Options, then select the Whitelist tab. This will allow only certain web sites to execute scripts.
- Tor settings – this is the most important feature. When the logo is green, you are connected to the Tor network. Click the pull down menu and you can see the nodes that you’re connected to.
- HTTPS Everywhere – this feature forces HTTP web connections into its more secure version HTTPS.
- uBlock Origin – the Tor Browser’s adblocker.
There is a second browser included with Tails – the Unsafe Browser. The only time you should use it is when connecting to a public Wi-Fi connection that has a splash page, like in a restaurant or bookstore. Once you connect to the public Wi-Fi signal, you can close the Unsafe Browser and use the Tor Browser again.
Tails comes with Gimp, a great image editing program that’s also available for Windows and macOS. There is also Inkscape, a vector graphics creator similar to Adobe Acrobat.
LibreOffice is an open-source office suite. It’s capable of creating documents, spreadsheets, databases, and presentations. And yes, you can save files in Microsoft Office formats.
Thunderbird is Mozilla’s email program. It’s compatible with PGP.
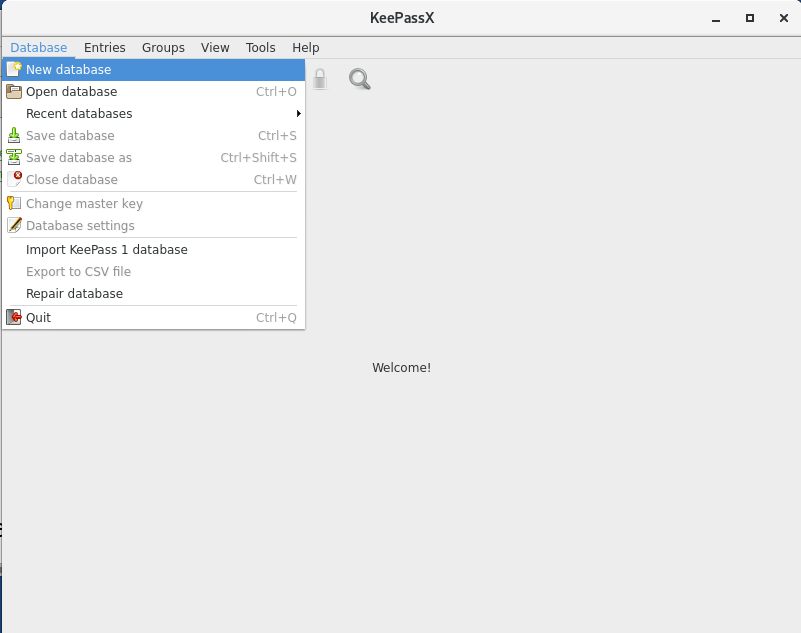
KeePassX is a password manager and generator. This is one of the most important programs included with Tails. It can store usernames and passwords for many things: email accounts, social media, even Wi-Fi connections.
Day 4: Problems
I took a lot of screenshots for this post. All of them were stored on my flash drive. Now how was I going to get them off the drive and uploaded to my web page? Since my flash drive was formatted for Tails, I couldn’t use it in Windows. I had to do something that I’m sure would send most Tor power users into a fit: log into my Google Drive.
I actually got to the Google Drive homepage, entered my email…and hit my first speed bump. You see, I have two-factor authentication enabled on my Google account. My trusty Yubikey was at my side, but there was something I had forgotten. Security keys only work when you log into Google with the Chrome browser. Fortunately, I used the text message option. I was in.
Now to upload!
What happened? I saved everything in the Public folder. The Public folder is for an old feature of Linux desktops called the Personal File Sharing Tool. This tool isn’t used in Tails, yet the Public folder is still there as a relic of an older time.
It turns out that the only place to store your files is in the persistent storage volume, which I should have created when I used Tails for the first time. The persistent storage volume is just a folder to store all your files. As its name implies, this is the only part of Tails that won’t change after a shutdown or reboot.
Tails also has something called AppArmor confinement. The Tor Browser can only access certain folders on your system. This is to protect your computer from malicious attacks; without AppArmor, a compromised web browser could lead to a compromised computer. To upload anything using the Tor Browser, first put the files in either the default Tor Browser folder or the Tor Browser folder in your persistent storage volume.
Day 5: Creating Persistent Storage
I needed a permanent way to store files; I didn’t want to repeat yesterday’s disaster. It was time to create my persistent storage volume. All I had to do was go to the Applications menu, select “Tails,” then select “Configure persistent volume.”The persistent storage volume needed a passphrase to lock and unlock it at startup. I made sure to write it down immediately, because I didn’t want to lose my files yet again.
Day 6: Security
Every time I logged onto Wi-Fi at home, I had to reenter the password. Could I permanently store things besides files, like Wi-Fi passwords? Yes, I could but only do this with KeePassX. This was the first time I had ever used a password manager. It was very easy to setup, and I plan on using it more in the future.
When I first opened KeePassX, I went to the Database menu and selected “New database.” I created a master passphrase (a password) to lock it, and I gave this database a name. Then I saved the database in my persistent storage.
If you want to see more of what you can do with KeePassX, read the full guide at
Security In A Box.
I found another way to connect to a public Wi-Fi connection that requires a password, but not a splash page. Open the Applications menu, select System Tools, then Settings, then Network. Click the name of the Wi-Fi connection, then enter the password.
When you start Tails, you’re given the option of setting an Administration password. This option is always turned off by default. In fact, you probably won’t even need one. But just in case you need to make some changes (like installing new software), here’s how to create one.
At the bottom of the Greeter, there is an option for Additional Settings. When you press the “+” button, there will be a popup menu that includes an option for creating an Administration password.
Day 7: Onion Services
On the seventh day, I finally used an onion service. As I said in my previous post about Tor, onion services are websites and other Internet resources that are only accessible through the Tor network. There are marketplaces (like the infamous Silk Road), forums, and secure sites for whistleblowers to give documents to journalists.
I kept it simple and used an onion service for email. Protonmail, an encrypted email provider, has their own onion service. Just access it with the Tor Browser. The interface isn’t much different from the regular version.
 This is the login page for Protonmail’s onion service. It’s the same as the login page for the web version, except for the address.
Using Tails isn’t quite as easy as using Windows, Mac, or Android. Installing it will involve some extra steps. You may have to do things that you’re not used to doing. But if you need more privacy while using the Internet, the benefits are worth it.


 This is the login page for Protonmail’s onion service. It’s the same as the login page for the web version, except for the address.
Not at all clear why you need the second USB. Why can’t you use the first one for a ‘new installation’?